My Blog List

Sunday, June 28, 2009

Perfect Party Cake - A New Recipe


I love Dorie's recipe for the Perfect Party Cake but I made it twice last year - the first time for Daring Bakers and the second time for a special order for one of my co-workers, who was having a party at his home. I got it right the second time - it rose quite nicely and I am told that everyone loved it.

However, I'm going slightly rogue this week as I am trying a recipe from Cook's Illustrated -(am not sure if I will get TWD credit). Just needed a change and this recipe looked very interesting. It has an unusual mixing method, rises beautifully and it seems to avoid the "air holes" problem that sometimes happens in white cakes. (Haven't cut into it yet so am not absolutely sure.)

Here is the recipe:

Cook's Illustrated White Layer Cake

Cake layers can be wrapped and stored for one day. Once assembled, the cake should be covered with an inverted bowl or cake cover and refrigerated.

12 servings

2 1/4 cups cake flour (9 ounces), plus more for dusting the pans
1 cup whole milk, at room temperature
6 large egg whites (3/4 cup), at room temperature
2 teaspoons almond extract
1 teaspoon vanilla extract
1 3/4 cups granulated sugar (12 1/4 ounces)
4 teaspoons baking powder
1 teaspoon table salt
12 tablespoons unsalted butter (1 1/2 sticks), softened but still cool

Set oven rack in middle position. (If oven is too small to cook both layers on a single rack, set racks in upper-middle and lower-middle positions.) Heat oven to 350 degrees. Spray two 9-inch round cake pans with nonstick
cooking spray; line the bottoms with parchment or waxed paper rounds. Spray the paper rounds, dust the pans with flour, and invert pans and rap sharply to remove excess flour.
Pour milk, egg whites, and extracts into 2-cup glass measure, and mix with fork until blended.
Mix cake flour, sugar, baking powder, and salt in bowl of electric mixer at slow speed. Add butter; continue beating
at slow speed until mixture resembles moist crumbs, with no powdery streaks remaining.
Add all but 1/2 cup of milk mixture to crumbs and beat at medium speed (or high speed if using handheld mixer) for 1 1/2 minutes. Add remaining 1/2 cup of milk mixture
and beat 30 seconds more. Stop mixer and scrape sides of bowl. Return mixer to medium (or high) speed and beat 20 seconds longer.
Divide batter evenly between two prepared cake pans; using rubber spatula, spread batter to pan walls and smooth tops. Arrange pans at least 3 inches from the oven walls and 3 inches apart. (If oven is small, place pans on separate racks in staggered fashion to allow for air circulation.) Bake until thin skewer or toothpick inserted
in the center comes out clean, 23 to 25 minutes. (I think this is way to low - mine took about 35 mins.)Let cakes rest in pans for 3 minutes. Loosen from sides of pans with a knife, if necessary, and invert onto wire racks. Reinvert onto additional wire racks. Let cool completely,
about 1 1/2 hours.

And everything else... I used Dorie's buttercream recipe; it's absolutely delicious and makes up fairly easily. Instead of raspberry jam I used Morello Cherry Jam (gave it a few whirrs in the food processor to smoothe it). It has a slightly sour taste, rather nice, as the buttercream is rich. Unfortunately I slathered too much jam on the middle layer so it was difficult to frost.

Tomorrow at the Office I will serve this pretty pale pink cake. I'm keeping my fingers crossed that it's not dry. In fact, it's the next morning and I have just eaten the slice in the pic. It's delicious, and not an air hole in sight. This recipe is another keeper. It got rave reviews at work and there was some left over for today, Tuesday, so they can enjoy a second slice. It's a large cake with only about 6-8 people to eat it.

Lovely recipe for White Cake!

Thursday, June 25, 2009

Bakewell Tart - Daring Bakers


The June Daring Bakers' challenge was hosted by Jasmine of Confessions of a Cardamom Addict and Annemarie of Ambrosia and Nectar. They chose a Traditional (UK) Bakewell Tart... er... pudding that was inspired by a rich baking history dating back to the 1800's in England.

I've always thought of this delightful dessert as a tart. They are just so popular in England - little Bakewell Tarts are sold in packages in many supermarkets and grocery stores. For us in New York, Myers of Keswick in the Village sometimes sells these small packs. Now I'm wondering if Jane Austen's Elizabeth and Darcy ever ate Bakewell Tart as Pemberley was in Derbyshire, or maybe that was before the tart became popular.

I haven't made this before - it turned out to be enjoyable to make and to eat. A nice almond tart with jam, what more could a British origin food lover want! I'm not sure if it was a hit at work - I didn't hear ravings, only a couple of "goods."

Besides the filling (I love anything with almond),I also loved the pastry. The recipe made a generous amount with plenty to go for a 1/4 inch thick tart base. It was just perfectly sweetened, not too much. I will definitly use this pastry again for a dessert tart.

Way to go, Jasmine and Annemarie! Thank you for a lovely challenge.

Here's the recipe:

Bakewell Tart…er…pudding
Makes one 23cm (9” tart)
Prep time: less than 10 minutes (plus time for the individual elements)
Resting time: 15 minutes
Baking time: 30 minutes
Equipment needed: 23cm (9”) tart pan or pie tin (preferably with ridged edges), rolling pin

One quantity sweet shortcrust pastry (recipe follows)
Bench flour
250ml (1cup (8 US fl. oz)) jam or curd, warmed for spreadability
One quantity frangipane (recipe follows)
One handful blanched, flaked almonds

Assembling the tart
Place the chilled dough disc on a lightly floured surface. If it's overly cold, you will need to let it become acclimatised for about 15 minutes before you roll it out. Flour the rolling pin and roll the pastry to 5mm (1/4”) thickness, by rolling in one direction only (start from the centre and roll away from you), and turning the disc a quarter turn after each roll. When the pastry is to the desired size and thickness, transfer it to the tart pan, press in and trim the excess dough. Patch any holes, fissures or tears with trimmed bits. Chill in the freezer for 15 minutes.

Preheat oven to 200C/400F.

Remove shell from freezer, spread as even a layer as you can of jam onto the pastry base. Top with frangipane, spreading to cover the entire surface of the tart. Smooth the top and pop into the oven for 30 minutes. Five minutes before the tart is done, the top will be poofy and brownish. Remove from oven and strew flaked almonds on top and return to the heat for the last five minutes of baking.

The finished tart will have a golden crust and the frangipane will be tanned, poofy and a bit spongy-looking. Remove from the oven and cool on the counter. Serve warm, with crème fraîche, whipped cream or custard sauce if you wish.

When you slice into the tart, the almond paste will be firm, but slightly squidgy and the crust should be crisp but not tough.

Frangipane
Prep time: 10-15 minutes
Equipment needed: bowls, hand mixer, rubber spatula

125g (4.5oz) unsalted butter, softened
125g (4.5oz) icing sugar
3 (3) eggs
2.5ml (½ tsp) almond extract
125g (4.5oz) ground almonds
30g (1oz) all purpose flour

Cream butter and sugar together for about a minute or until the mixture is primrose in colour and very fluffy. Scrape down the side of the bowl and add the eggs, one at a time, beating well after each addition. The batter may appear to curdle. In the words of Douglas Adams: Don’t panic. Really. It’ll be fine. After all three are in, pour in the almond extract and mix for about another 30 seconds and scrape down the sides again. With the beaters on, spoon in the ground nuts and the flour. Mix well. The mixture will be soft, keep its slightly curdled look (mostly from the almonds) and retain its pallid yellow colour.

Here's hoping July's challenge will also be something sweet - please, please, pretty please.

Sunday, June 21, 2009

Coconut-Roasted Pineapple Dacquoise - Tuesdays with Dorie


Quite fussy to make but now that it's all done, what a lovely fancy dessert! I can just see myself offering to bring dessert for a dinner party (if I get an invitation, that is) and smiling broadly as I receive praise, while "modestly" replying that it was not much trouble at all.

I can't do a full taste test as it's all compiled, looking very ritzy in my opinion, but the sum of the parts is the whole, is it not? In spite of the never-ending rain here in New York, this Sunday has been full of treats for me - little pinches of roasted coconut, some of the juicy pineapple slices I bought, a crumble of the divine dacquoise and a spoonful (or two, or three) of the white chocolate ganache. I was too busy to look out of the window.

I just love this whole meringue thing - I think I'll try an Australian Pavlova for next week. I must watch the humidity level though; I read somewhere that meringue does not do well in humid weather so I'm pleased to have had the chance to make this beautiful dacquoise before the July/August heat strikes.

Thank you Andrea, of Andrea in the Kitchen for this wonderful pick.

Sunday, June 14, 2009

The Honey-Peach Icecream that Wasn't

Sorry! No ice cream for Tuesday With Dorie. I seem to be going through a bad stage - that fairy at the top of my blog is doing nothing to help me. My custard didn't set up, not at all.

Will be back on my horse next week.

Wednesday, June 10, 2009

Apple Puff Pastry Dessert - Skills Improvement Level l


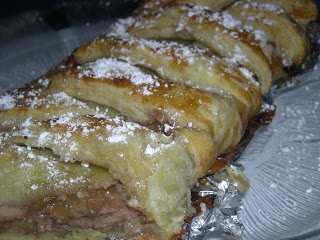
Now here is a dessert I could take to work! After my rather dismal adventure yesterday with weighing down puff pastry with a load of jam, I decided to try another puff pastry recipe.

Before I ramble on any further, my "Apple Puff Pastry Dessert," from That's My Home, was a huge success. My boss even buzzed me on the intercom to say it was his favorite of the cakes so far! (Pity I work as a civil servant - no raises for bringing in cake, only union raises, which are few and far between.)

So now I am all eager to climb the puff pastry ladder. Once again I used Pepperidge Farm and made a simple braid. It cut nicely into 8 slices and I advised the group to blits it for about 20 seconds in the microwave. Cold apple slices just don't do anything for me.

It was easy to make. I let it bake for 30-35 minutes without peeking at it a hundred times (which is what I usually do). In fact I was on the phone with a friend, which is an excellent way not to obsess about baking time.

Now the big thing is I am so excited about becoming a good puff pastry baker. Vibi of La Casserole Caree has given me some excellent advice to keep the pastry cold and to start the oven at 400 degrees to "shock" the pastry into puffing up - that will be my next step, also to get Trader Joe's puff pastry, which, I believe, is all butter.

That will be Level 2 of puff pastry skills improvement. Level 3 will be using a quick, make-it-yourself puff pastry recipe - I am sure that will be less expensive than Trader Joe's. No Dufour pastry - just too pricey.

Then my plan for Level 4 is to make the real, time-consuming puff pastry. But that will be a one-time challenge - just don't have the time to nurse it for so many hours on a regular basis.

After that I will be all puffed up with conceit and able to make desserts and appetizers that I thought were the territory of bakery shops.

Here is the Apple Puff Pastry Dessert recipe:

Apple Puff Pastry Dessert
2 C. peeled and sliced apples

1/3 C. firmly packed brown sugar

2 T. margarine

1/4 C. light corn syrup

1/2 C. chopped walnuts

1/4 t. cinnamon

Nonstick cooking spray

3 oz. cream cheese, softened

2 T. sugar

1/4 t. vanilla extract

1 egg, separated (1 egg yolk and 1 white)

1 sheet frozen puff pastry, thawed (half of a 17 1/4-ounce package)

1 t. water

1/4 to 1/2 C. confectioners' sugar, sifted

In a large skillet, place the apple slices, brown sugar, margarine, corn syrup, walnuts and cinnamon. Cook over medium heat, stirring frequently, about 5 minutes or until the apple slices are almost tender. Drain the apples, reserving syrup. Cool the apple mixture.

Spray a baking sheet with nonstick cooking spray; set aside. Preheat the oven to 375°F.

In a medium bowl, combine the cream cheese, sugar, vanilla and egg yolk. Set aside.

On a lightly floured work surface, roll the pastry sheet into a 12 x 10-inch rectangle. Place on the prepared baking sheet. Spread the cream cheese mixture vertically down the center one-third of the pastry. Place the cooled apple mixture on the cheese. Cut the sides of the pastry into 1-inch strips to fold over the filling. Starting at one end, alternately cross strips at an angle, gently pressing onto the apples. Mix the egg white with water, and brush the mixture on the top and sides of the pastry.

Bake 35 minutes or until golden brown. While the pastry is baking, mix together the reserved syrup with the desired amount of confectioners' sugar to make a glaze. Remove the pastry from the oven, cool about 10 minutes, then drizzle with the glaze. Serve warm or cold.

Serves 8.

Monday, June 8, 2009

Parisian Apple Tart - Tuesdays with Dorie


"The King was in his counting house counting out his money
The Queen was in the parlour eating tarts and honey."

Well, in the old nursery rhyme it was bread and honey.

I'm on the case right now - I have just tested tartlet no. 1, a 2-1/2 inch tart cut from Pepperidge Farm Puff Pastry, baked at 350 degrees for 20 minutes. It has puffed a little bit and is palatable, but there is a problem with the apple filling. I chose to use finely chopped apple and placed about 1-1/2 teaspoons, mixed in brown sugar, on the tart shape. The filling has come out very dry.

So on to tart no.2 - I raised the temperature to 375 degrees and drizzled a half teaspoon of clover honey over the apple filling. And that is why the Queen is eating Tarts and Honey.

Tart no. 2 has done beautifully at 375 degrees for about 17 minutes; it's puffed up like a vol-u-vent case. Now I'm waiting for it to cool for the taste test; hopefully there will soon be lots of little tartlets sitting on a plate, waiting for their photo op.

A dozen Tart 3's are busy baking - Tart No. 2, although well risen, still didn't have any apple flavor, so, feeling a bit panicky by now, I put a blob of raspberry jam on each pastry, then the apple, then the honey. It surely had to taste nice now. Of course, I have identified the culprit - tasteless, "economy" apples I bought at the local supermarket. If only I had bought Granny Smiths, with their sour-sweet tang.

Oh dear! What happened to the beautiful vol-u-vent puffs for Tart no.2! Jam is oozing out all over and they are as flat as pancakes. The Queen will just have to get out of the parlour and go to work empty-handed.

I'm posting because I've been goofing off with TWD lately, making comfort cookies instead of following the schedule. I'm just going to have to browse through all the blogs tomorrow to see how things should really be.

However, I had a lot of fun with the puff pastry and want to say "Thank you" to Jessica of My Baking Heart for her selection. It has endless possibilities.

Wednesday, June 3, 2009

Chocolate Chip Cookies and Coconut Chews


For our Troops in the Middle East. This month it's for a young lady who is stationed over there. I made Chocolate Chip Cookies and Coconut Chews. The Chocolate Chip Cookies are good but I would not say they are stupendous, but the Coconut Chews! Oh, yum, yum, yum! Definitely will make again. I always pack two 10-inch square cake boxes, which fit neatly into the APO Box (not sure what the acronym is for but it's military) - needless to say I had a few taste tests but fortunately had plenty left over to fill the package to capacity. (I should hope so! - I reckon about 120-130 cookies are needed to fill the two cake boxes.)

I love doing the Baking Gals cookie making for our Troops; it's a monthly mailing and each time I send my package to a different soldier. It's also fun to surf through the cookie sites and get recipes for real, down home, family type cookies and bars - the kind of goodies that will remind our soldiers of home.

This time I used two recipes that use Crisco instead of butter - apparently it keeps the shape of the cookie better and they last longer, which is a plus as it gets very hot in Iraq.

The Chocolate Chip Cookies are from Recipezaar (another favorite site for me):

Ingredients
2/3 cup solid shortening (no substitutes just use plain white shortening)
2/3 cup margarine (not butter)
1 cup sugar
1 cup brown sugar (packed)
2 eggs
2 teaspoons vanilla
3 cups flour
1 teaspoon baking soda
1/2 teaspoon salt
12 ounces milk chocolate or semi-sweet chocolate chips
1 cup nuts (chopped optional)

Method

Cream together shortening, butter, sugar, brown sugar, eggs and vanilla.
stir in remaining ingredients.
drop by teaspoon full onto ungreased cookie sheet.
bake at 375 for 8-10 minutes or until cookie is lightly brown on top and darker brown on edges.

The Coconut Chews are from Recipe Goldmine.

Ingredients
3/4 cup butter or Crisco
3/4 cup confectioners' sugar
1 1/2 cups all-purpose flour
2 eggs
1 cup (packed) brown sugar
1/2 tablespoon baking powder
1/2 tablespoon salt
1 teaspoon vanilla extract
1/2 cup chopped walnuts
1/2 cup coconut

Method

Heat oven to 350 degrees F.

Cream butter and confectioners' sugar until light and fluffy. Blend in flour. Press evenly in 13 x 9 x 2-inch pan. Bake for 12 to 15 minutes.

Combine remaining ingredients; spread over hot baked layer. Bake for 20 minutes longer. Slice into squares when cooled.

My package will be mailed tomorrow AM - it takes about a week to get there.