My Blog List

Thursday, March 26, 2009

Baking for a Reception


This is a photo of goodies I made for a reception at our Church this past Wednesday, March 25th. I had the responsiblity of doing the sweet stuff and others presented delicious savories.

I made chocky cake, mini-mini tartlets with cream and blueberry pie filling, mini tartlets with lemon curd cream and some almond cookies. The chocky cake and the mini-mini's are in the picture. My project involved making around 300 items - a lot of work, but very creative for me and much fun except for a couple of hair-raising moments when the pastry wouldn't come out of the tart tins!

A new trick - after using a press-down method for dough in the tartlet tins, refrigerate for about an hour. This makes the tartlet dough rise evenly when blind-baking.

Another new trick - after baking, freeze cooled pastries in their tins for about 30 mins then dip the base of each tin into some boiling water for a few seconds, remove, then ease the pastry shells out of the tins by thumb - they will come out nicely - paper thin and even. (This took hours of practice - I finally have it right).

I used Dorie Greenspan's Pate Sucre recipe for the pastry dough (will I ever use anything else!) and a great Chocolate Buttermilk Sheet Cake recipe(from Diana's Desserts).

Here are the recipes:
Dorie Greenspan's Pate Sucre Recipe

SWEET TART DOUGH

1 1/2 cups all-purpose flour
1/2 cup confectioners' sugar
1/4 teaspoon salt
1 stick plus 1 tablespoon (4 1/2 ounces) very cold (or frozen) unsalted butter, cut into small pieces
1 large egg yolk

To make the dough: Put the flour, confectioners’ sugar and salt in the workbowl of a food processor and pulse a couple of times to combine. Scatter the pieces of butter over the dry ingredients and pulse until the butter is cut in coarsely – you’ll have pieces the size of oatmeal flakes and pea-size pieces and that’s just fine. Stir the egg, just to break it up, and add it a little at a time, pulsing after each addition. When the egg is in, process in long pulses – about 10 seconds each – until the dough, which will look granular soon after the egg is added, forms clumps and curds. Just before your reaches this clumpy stage, the sound of the machine working the dough will change – heads up. Turn the dough out onto a work surface.

Very lightly and sparingly – make that very, very lightly and sparingly – knead the dough just to incorporate any dry ingredients that might have escaped mixing.

If you want to press the dough into a tart pan, now is the time to do it.

If you want to chill the dough and roll it out later (doable, but fussier than pressing), gather the dough into a ball (you might have to use a little more pressure than you used to mix in dry bits, because you do want the ball to be just this side of cohesive), flatten it into a disk, wrap it well and chill it for at least 2 hours or for up to 1 day.

To make a press-in crust: Butter the tart pan and press the dough evenly along the bottom and up the sides of the pan. Don’t be stingy – you want a crust with a little heft because you want to be able to both taste and feel it. Also, don’t be too heavy-handed – you want to press the crust in so that the pieces cling to one another and knit together when baked, but you don’t want to press so hard that the crust loses its crumbly shortbreadish texture. Freeze the crust for at least 30 minutes, preferably longer, before baking.

Chocolate Buttermilk Sheet Cake - from Diana's Desserts

Ingredients:

1/2 cup (1 stick/4 oz./113g) unsalted butter, at room temperature
1/2 cup unsweetened cocoa powder
1 cup water
1/2 cup vegetable oil
1 teaspoon vanilla extract
1 teaspoon baking soda
2 cups granulated sugar
2 cups all-purpose flour
1/2 teaspoon ground cinnamon
1/2 teaspoon salt
1/2 cup buttermilk
2 large eggs, lightly beaten


Instructions:
Preheat oven to 400 degrees F/200 degrees C. Butter and flour a 9 x 13-inch baking pan.

In a medium saucepan on medium heat, melt the butter and cocoa with the 1 cup water.

With an electric mixer, beat together the melted butter mixture, vegetable oil, vanilla and baking soda. Beat in sugar, flour, cinnamon, salt, then the buttermilk and lightly beaten eggs. Spread batter in prepared baking pan. Bake cake in preheated oven until toothpick inserted into center of cake comes out clean, 20-25 minutes (I found 30 mins. was the correct time). Transfer cake (in pan) to cooling rack.

Makes 1 (9 x 13-inch) sheet cake, 24 servings.

And then there's the frosting from one of my favorite sites. It was rich and delicious:
Creamy Chocolate Frosting.

INGREDIENTS
2 3/4 cups confectioners' sugar
6 tablespoons unsweetened cocoa powder
6 tablespoons butter
5 tablespoons evaporated milk
1 teaspoon vanilla extract

DIRECTIONS
In a medium bowl, sift together the confectioners' sugar and cocoa, and set aside.
In a large bowl, cream butter until smooth, then gradually beat in sugar mixture alternately with evaporated milk. Blend in vanilla. Beat until light and fluffy. If necessary, adjust consistency with more milk or sugar.

The reception went very well and the cakes certainly contributed to its success.

Wednesday, March 18, 2009

Raspberry Crumb Cake - Tuesdays with Dorie


They loved it! My co-workers exclaimed, "In the top three!" "This is my favorite kind of cake." "I don't suppose there's anymore of that left." (The top three at work are: apple cheesecake; pear tartlets and now raspberry crumb cake). It is a super, super cake - I have made a coffee cake before but never a crumb cake up until now. May there be many more crumb cakes to come.

Thank you's go to Sihan of Befuddlement for this opportunity to bake a 5-STAR cake! The recipe is on Sihan's blog.

Saturday, March 14, 2009

French Yoghurt Cake - Tuesdays with Dorie


What a wonderful cake! I have to confess that I am not able to give it a full photo - the two slices here are all that remains after a neighbor and I tucked into the still warm loaf and had a little gobble!

It is delicious; it has quite a coarse crumb (I'm not sure if other people found this) and it tastes very moist. I just love the deep golden honey color on the top of the loaf and the edges that are a little bit crispy. I didn't make the marmalade glaze - too busy eating, but it tastes wonderful as it is, just plain.

It was incredibly easy to make and there were very few bowls and utensils to wash. In a way I'm a bit surprised that French bakers would put oil in this cake as so many French desserts contain quite a lot of butter. There must be a reason for it. It makes for an interesting change anyway.

Now what am I going to take to the Office for 'Tuesday's Treat?' Maybe next week's Crumb Cake but I'll make sure I photograph the whole thing first then save the posting till the due date.

Lovely choice, Liliana, of My Cookbook Addiction. Thank you. (The recipe is on Liliana's blog).

Tuesday, March 10, 2009

Lemon Cupcakes


I made these to take to work as I couldn't very well take the flan I made for TWD. A dozen fluffy, soft-crumb cupcakes were consumed in no time at all. I also made some cream cheese/mascarpone cheese frosting but it was a bit soft, I think. The lemon cupcake recipe comes from Recipezaar and I just love it:

Recipe


3/4 cup butter, softened
1 cup sugar
2 eggs
1 teaspoon vanilla extract
1 teaspoon grated lemon peel
1 1/2 cups cake flour
1/2 teaspoon baking powder
1/4 teaspoon baking soda
1/4 teaspoon salt
2/3 cup buttermilk

In a mixing bowl, cream butter and sugar. Add eggs, one at a time, beating well after each. Add vanilla and lemon peel. Combine flour, baking powder, baking soda and salt; add to creamed mixture alternately with buttermilk.
3Fill paper-lined muffin cups three-fourths full. Bake at 350 for 20-25 minutes or until a toothpick comes out clean. Cool 10 minutes; remove from pan to a wire rack. Cool completely.

It can actually make more than a dozen, more like 16, as my regular cupcake pan seemed a bit small for the rising batter. A heaped TBS. of batter in each cup should be about right.

To be repeated. Now I have a very nice award to give to some favorite bloggers:
------------------------


I've received this really cute blog award, The Adorable Blog Award, from Maria at The Goddess's Kitchen - a lovely British blog with recipes for all sorts of goodies such as Victoria Sponge Cake and Christmas mince pies and many more. I would like to pass on my award to five people whose blogs I enjoy very much - some I have been reading for quite a while, while others are new excellent finds for me:

Amy @The Amysing Baker
Tanya @Chocolatechic
Gigi @Gigi Cakes
Wendy @Pink Stripes
Teanna @Spork or Foon?

Just love your Blogs! There's a 'pass along' rule of course, so please pick as many adorable blogs as you wish for sending this award to.
Include the award logo in your blog or post.
Be sure to link to your nominees within your post.
Let them know that they have received this award by commenting on their blog.

Until our next baking adventure - Heather

Sunday, March 8, 2009

Lemon Cup Custard - Tuesdays with Dorie


I came sulking and pouting to this recipe, swearing I would make something else (I will for my Office but only because the custard is not portable - that is, it's not going on the A train, or any other train for that matter!). But now I am a convert -I made the custard and it's delicate and delicious and definitely on my 'make again' list.

I halved the recipe ingredients, except for the lemon zest, and added a couple of drops of lemon essence. It took longer to bake than Dorie said, about 50 minutes! But finally, two red hearts of lemon custard and one round Pyrex dish came out of the bain marie. It was plenty lemony enough but that must be because of the double lemon zest. Not surprisingly, there is only one red heart left, waiting for it's daylight photo opportunity. I've just eaten the other two cups.

I've made a rich stove top custard from scratch before, when preparing a Sherry Trifle (favorite pudding dessert), but this fine baked custard has got class, oh, my it's got class! I think it would be nice served with something else light, maybe some fresh fruit dusted with caster sugar or confectioners' sugar.

Many thanks to Bridget of The Way the Cookie Crumbles for this delightful pick. The recipe is on Bridget's blog.

Tuesday, March 3, 2009

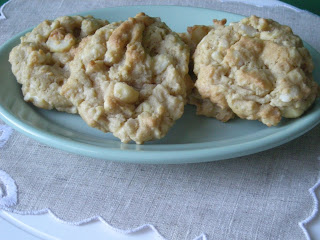
White Chocolate Macadamia Nut Cookies


These cookies are absolutely divine! Just the best! They come together very easily and are quick to make. I got the recipe from Recipezaar, one of my favorite sites.


Here it is:
(makes about 24-28 cookies)
Ingredients
1/2 cup butter, softened
1 cup brown sugar
1/2 cup coconut flakes, finely minced
1 egg
1 tablespoon milk
1 teaspoon vanilla
1 1/2 cups flour
2 teaspoons baking soda
1/2 teaspoon baking powder
1/2 teaspoon salt
8 ounces solid white baking chocolate, cut into chunks
1 cup macadamia nuts, chopped

Directions
Cream together the butter and sugar in a large bowl with a mixer on high speed. Add the coconut, egg, milk, and vanilla; mix well.
In another bowl, combine the flour, baking soda, baking powder, and salt.
Add the dry mixture to the wet mixture and mix until dough forms. Mis in the white chocolate and macadamia nuts.
Preheat the oven to 300 F while you let the dough rest for 30-60 minutes in the refrigerator.
Measure out about 2 1/2 tablespoons of the dough and form a ball. Drop each ball of dough onto an ungreased cookie sheet about 3 inches apart and bake for 12-14 minutes.
Do not overbake! Cookies should come out of the oven appearing slightly browned, yet undercooked.
When cooled, the cookies will be soft and chewy.

Bake and enjoy!

**[I set mine to 325 degrees and baked the cookies for 14 minutes - they turned out beautifully]

Monday, March 2, 2009

Chocolate - Rum and Raisin Cake - Tuesdays with Dorie


I decided to make Dorie's Prune Armagnac Cake a Rum and Raisin Cake instead. I didn't do the fire trick - I am rather clumsy, so there was a strong possibility I would drop the flaming pan on the floor or something like that. I used some good Dominican Rum, Anejo Gran Reserva Familiar
. I think rum and raisins always go pretty well together. I let the mixture soak for over 24 hours in a ball jar.

Cake's done and I think it's going to be rather a darling. I've had a bit of a bad run lately, what with problems with my starter blog and a couple of recipes falling flat on their faces, so hopefully Dorie's cake will get me out of it.

It was easy to put together and I was pleased to see that it wasn't flourless (am at present very intimidated by flourless). I left it to bake for 30 minutes - it rose quite nicely and there was no heart-sinking collapse when I took it out of the oven. In fact, it has that lovely brownie-type crispy crust on the top and I think I met Dorie's "streaky" criterion okay.

A little hitch, but if it tastes as good as I think it will, I won't care - as I was trying to get it off the springform base a small section at the side cracked. I put the springform ring back on to dam it up and will cover the crack with chocolate frosting. [Next time I use a springform,or cheesecake pan with a removable base, I'll make the parchment lining about 1/4 inch larger in circumference than the base of the pan - that way it will be easy to just take hold of the parchment and gently pull the cake off onto the cooling rack.]

I had to cut and taste it - no more actually waiting for Tuesday. The slice in my pic. is now gobbled, gobbled, gone. It's delicious - the chocolate is just right - not too sweet, nor too bitter. I used the Giaradelli Semi-Sweet and for the frosting a mix of Semi-Sweet and Milk chocolate morsels. The rum and raisins really pack a punch too. It's really like a couture brownie; perhaps on a re-make I would keep it in the oven for a few more minutes; it's a bit soft but that doesn't make it any less delicious.

I want to say a big thank you to LyB of And Then I Do the Dishes. Great choice!

Sunday, March 1, 2009

Gum Paste Flowers


This is something I've been wanting to get into for quite a while. I love crafts-type work and making gumpaste flowers from purchased molds is just the thing for me.

I bought the necessary supplies at New York Cake and Kerekes - glucose gel, tragacanth gum, and flower and leaf molds, and a small fondant rolling pin. Sugarcraft has an excellent, easy recipe and full instructions on how to get started with gumpaste. [The commercial gumpaste is awful, tastes and smells just like soap, so it's worth making your own.] I worked just a few at a time, as the instructions say, and have stored them in a plastic container so they won't crack.

Here's the recipe I used:

Gum paste recipe by Josefa Barloco
1 tablespoon Gum-tex or tragacanth gum
1 heaping tablespoon glucose
3 tablespoons warm water
1 tablespoon lemon juice
1 pound powdered sugar

Mix warm water and glucose until glucose is absorbed. Add the gum and lemon juice and, after these ingredients are thoroughly mixed, add small amounts of -powdered sugar until you can work the mixture with your hands. Continue adding small amounts of powdered sugar as you knead the mixture on a table top. As soon as the mixture is pliable and can be shaped without sticking to your fingers, you've added enough sugar (a pound or more) and the gum is of correct working consistency.

If you're not going to use the gum paste mixture immediately, place it in a plastic bag and then i n a covered container to prevent drying. When stored properly, your gum paste will keep for several months. Gum paste handles best when it is several days old.

How to color gum paste

Once you've made the gum paste recipe, you can tint it any color you desire, or divide the mixture and tint it several different colors.

To color gumpaste, apply small amounts of liquid or paste food color with a toothpick. Then with your hands, knead and work the color into the gum paste piece until the tint is evenly applied. If you would like a deeper shade, you can add more color a little at a time, and re-work the gum paste until you achieve the desired shade. Remember, you can always darken a color easier than you can lighten one.

How to roll out gum paste

Always dust your work surface with cornstarch first! This is standard procedure for rolling out gum paste to cut any floral shape. After your work surface is adequately dusted, take a small piece of gum paste, work it awhile with your hands and then place it on the LIGHTLY cornstarch-covered area. Now dust more cornstarch on the surface of your rolling pin and roll out gum paste until it's the thickness you desire—this is usually about 1/16-inch for most flowers. Remember, roll out one small piece of gum paste at a time to avoid drying; and cover every petal and flower cut you make.

How to hand-work gum paste

When you remove gum paste from a plastic bag or covered container, you will need to re-work it with your hands until it's soft and pliable once again. If the gum paste has been stored for some time and seems a little stiff, add a small piece of freshly made gum paste and then re-work it with your hands.

Important reminders:


ALWAYS dust work surface, rolling pin and your hands with cornstarch when handling gum paste and flower cuts.

ALWAYS keep gum paste and flower cuts covered to prevent drying.

ALWAYS add food coloring in small amounts until you achieve the gum paste tint you desire.

ALWAYS re-work gum paste before rolling it out to cut flowers and, if the gum paste has been stored for sometime, add a small piece of freshly made gum paste and re-work until pliable.

TIP: I found this recipe in a Wilton book (now out of print) and Wilton always presses people to use a lot of cornstarch. This is not always a good idea. Cornstarch WILL crack your petals. Instead, I would grease surface and hands using Crisco to prevent sticking. This way you can get your petals much thinner - like real ones.
I use special Boards and rolling pins. It makes the flowers much prettier and faster:
Check out the CellBoards when wiring or making the Mexican Hat style.
Use a CelPin rolling pin so gumpaste doesn't stick and is nice and smooth when rolled out. Article by Dolores at Sugarcraft
-------------
I really enjoyed making these. I can also recommend a lovely blog entry on making gumpaste daisies, by Mary Anne of Meet Me in the Kitchen . This is actually what got me inspired.