My Blog List

Friday, November 16, 2012

Mini Cheesecakes

 
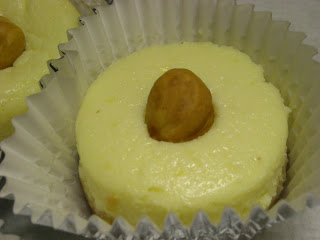
Here are some nice little Mini Cheesecakes, and I would be feeling a lot happier if I did not have to deal with the new ( to me) blogger format. However, I suppose I will become accustomed to it.

I found a recipe (slightly adapted) from the blog, "Pinch My Salt" and it is delightful - cute, delicious, pretty, not too fattening due to portion control - what more could one want in cheesecake!

One must use a mini cheesecake pan with removable discs - the one I have is by "Norpro''.

Crust:
1/2 cup each of ground Nilla Wafers and Animal Crackers
2 Tbs. brown sugar
1/3 stick melted butter

Filling:
1 8 oz. package cream cheese, room temperature
1/3 C. sour cream
1 egg + 1 egg yolk
1/3 C. sugar
finely grated zest of one orange

1. Preheat oven to 375 degrees.
2. Place crust ingredients in food processor and spin until mixture is finely crumbed and butter is absorbed. Press crumb mixture on bottom and slightly up the sides of each cheesecake pan cup. Use tart tamper to press down mixture firmly. Refrigerate for a couple of hours or even overnight.
3. Divide crumb mixture evenly between the 12 cups of your mini-cheesecake pan. Using your fingers or the back of a tablespoon, press crumbs firmly onto the bottom and partially up the sides of each cup. Use tart tamper to settle the crumb mix in each cheesecake hole and place in refrigerator for a couple of hours or even overnight.
4. Combine sugar and orange zest in a food processor and process until orange zest has been incorporated and sugar is fine.
5. Using an electric mixer, blend softened cream cheese, sour cream, egg, and orange sugar together in a medium bowl.
6. Spoon cream cheese mixture into the twelve cups, trying to divide the mixture as evenly as possible.
7. Bake for 18  minutes in a preheated 375 degree oven.
8. Remove from oven and place on rack to cool for 20 minutes then carefully remove cheesecakes from pan and let cool completely on rack.
9. Put cheesecakes in refrigerator and chill until ready to use.

One taster's comment: ''Absolutely delicious!'' Now I cannot wait to try a chocolate mini cheesecake recipe.


Tuesday, October 16, 2012

Sunday, September 16, 2012

White Chocolate Crunchy Squares


Another huge success at the Office. They are actually Blondies from the Joy of Baking. The recipe suggested to bake them for 25-30 minutes - I chose the 30 minutes and they came out a teeny bit dry, but nevertheless delicious.  Around 27 minutes should do the trick in my oven.

I have also found that lining my doughty 8-inch square Magic Line baking pan with foil prevents drying out at the edges; I was feeling a bit lazy and took a short cut, simply spraying Bakers' Joy on the inside of the pan. Probably any kind of blondie/brownie/square would benefit from a lining of foil.

Here is the recipe:

Blondies
3/4 cup pecan halves
1/2 cup unsalted butter
1 cup flour
1/4 tsp. salt (or a bit less)
1/4 tsp. baking soda
1 large egg
3/4 cup packed light brown sugar
1 tsp. vanilla
3.5 oz. bar of Lindt white eating chocolate, coarsely chopped into chips

Oven must be at 350 degrees F, rack in center. Prepare 8x8 pan with foil and Baker's Joy as described above.
Place pecans on baking sheet and toast for 8-10 minutes. Remove from oven, let cool and chop into coarse pieces.
Melt butter in saucepan; remove from heat, let cool to room temperature.
In bowl whisk flour, salt and baking soda.
In mixer bowl, beat egg and brown sugar until light and fluffy, about 3 minutes.
Beat in vanilla and melted butter.
Scrape sides of bowl and add in flour mixture until just incorporated.
Add in pecans and chocolate.
Pour batter into pan and bake until top is dry, golden brown and a toothpick comes out with just a few moist crumbs. (25-30 mins.)
Remove pan from oven and place on wire rack. Holding sides of foil, remove whole 8 inch square from pan and place on wire rack to cool completely.
Cut into squares. Store, covered, for 2-3 days or freeze for longer time.

Makes 16 blondies.


Tuesday, July 24, 2012

Coconut Pound Cake

This is a marvellous coconut cake! One of my favorite blogs is "The Goddess's Kitchen," written by a blogger in the U.K. Check out the recipe at http://thegoddesskitchen.blogspot.com/ The cake has a nice, firm consistency yet is lighter than a regular pound cake and uses dessicated coconut, not that sticky, gooey manufactured stuff that is usually dumped in coconut cakes. It baked up beautifully - I used a 7-inch square pan, with 3-inch high sides (could not find my loaf pan); it turned out to be a perfect fit and the cake baked in an hour. The group at work really enjoyed it - a nice cake for a hot day, sprinkled with confectioners' sugar. I am planning to use this recipe again for a wedding cake and for petit fours.

Wednesday, June 27, 2012

Battenberg Cake - Daring Bakers' June Challenge


Mandy of What The Fruitcake?! came to our rescue last minute to present us with the Battenberg Cake challenge! She highlighted Mary Berry’s techniques and recipes to allow us to create this unique little cake with ease.

This is a marvellous cake! I could not resist having 2 slices and most of my group at work absolutely loved it.

I used the traditional pink and yellow coloring with marzipan covering. I also used a Battenberg Cake pan that I bought at Fantes. It is an Alan Silverwood pan made in Britain and I just love it. I now have ideas of making petit four logs using this pan and, of course, a chocolate and pistachio Battenberg combination for the Holiday season this year.

For criss-cross impressions on top I used a cookie cooling tray; they show up ever so slighty on the right side of my picture.

Absolutely a make-again treat!

Thursday, May 24, 2012

Meringue Nests with Strawberries and Cream-


Absolutely delicious! A real treat! Recipe from Delia Smith, to follow.

Wednesday, April 25, 2012

Apple Crumble Slice


A very delicious Apple Crumble Slice recipe from Carole Walter's "Great Cookies." I used a combination of Granny Smith and Yellow Delicious Apples. I might make the crumble crust more buttery next time but it was a great success at work anyway.

Tuesday, April 17, 2012

Armenian Nutmeg Cake - Daring Bakers' April Challenge


Blog-checking lines: The Daring Bakers’ April 2012 challenge, hosted by Jason at Daily Candor, were two Armenian standards: nazook and nutmeg cake. Nazook is a layered yeasted dough pastry with a sweet filling, and nutmeg cake is a fragrant, nutty coffee-style cake.

My Armenian Nutmeg Cake. What a divine cake! I cut it into 20 slices and 6 people at work polished it all off, so I guess that's more than 3 slices each for some. It's the nutmeg that makes it so delicious - I mean, who wants run-of-the-mill cinnamon for a coffee cake when you can have nutmeg!


I think this would make a lovely Christmas Holiday season cake, perhaps drizzled with water icing - it would be a welcome change, I think, from the heavy-duty Christmas fruit cakes and so much easier and less expensive.

Some bench notes: I will try using unbleached AP flour next time (I used a mix of pastry and regular flour which seemed to be very light - the batter on top was way too liquidy so it took too long to bake and the center was still soft and gooey - I ended up lopping the middle out of it with a pastry ring!) I would also like to try a smaller size,using half quantities and say a 6 or 7 inch springform. I would also like to try buttermilk instead of milk.

Armenian Nutmeg Cake
Makes one 9”/23cm cake which yields 12 servings
Ingredients
 1 cup (240 ml) milk (I use whole, but nonfat
or lowfat should be fine; non-dairy might
work just fine, as well)
 1 teaspoon (5 ml) (5 gm) baking soda
 2 cups (480 ml) (280 gm/10 oz) all-purpose
(plain) flour (I suspect pastry flour or
another low-gluten flour might even work
better to achieve a light, fluffy crumb)
 2 teaspoons (10 ml) (10 gm) (⅓ oz) baking
powder (I used single-acting, because it's aluminum-free, and it turned out fantastic)
 2 cups (480 ml) (400 gm/14 oz) brown sugar, firmly packed
 3/4 cup (1½ sticks) (180 ml) (170 gm/6 oz) butter, preferably unsalted, cubed
 1/2 cup (120 ml) (55 gm/2 oz) walnut pieces, may need a little more
 1 to 1-1/2 teaspoons (5 to 7 ½ ml) (5 to 8 gm) ground nutmeg (try to grate it fresh yourself; the
aroma is enchanting)
 1 egg
Directions:


Food Processor Way

1. Preheat your oven to moderate 350°F/175°C/gas mark 4 .
2. Mix the baking soda (not baking powder) into the milk. Set aside.
3. Put the flour, baking powder, and the brown sugar into your food processor. Pulse until
uniformly mixed.
4. Toss in the cubed butter. Pulse until uniformly mixed into tan-colored crumbs.
5. Pour HALF of the crumbs into your springform (9”/23cm) pan. Press out a crust using your
fingers and knuckles.
6. Crack the egg into the food processor with the rest of the crumbs still in it.
7. Grate 1 to 1-1/2 teaspoon of nutmeg. Toss that into the food processor, too. Pulse until wellincorporated.
8. Pour in the milk and baking soda mixture. Continue to mix until a slightly lumpy tan batter is
formed.
9. Pour the batter over the crust in the springform pan.
10. Gently sprinkle the walnut pieces over the batter.
11. Bake in a preheated moderate oven for 30-40 minutes. It's ready when the top is golden brown,
and when it passes the toothpick test (comes out clean).
12. Cool the cake in the pan, and then dig in. Yum yum!

Saturday, April 14, 2012

Lemon Drizzle Cake


Not a great pic. but a great taste. The recipe is from "Best-Kept Secrets of the Women's Institute - Cakes and Biscuits" and everyone at the office loved it. I adapted it slightly, but ever so slightly.

Lemon Loaf Cake

Ingredients
6 ozs. butter, softened
6 ozs. superfine sugar (caster sugar)
2 eggs
4 Tbs. milk
6 ozs. self-raising flour, sifted
grated zest of one lemon
Optional for drizzle: juice of one lemon and 1 Tbs. sieved confectioners' sugar, combined.


Method

Cut good baking parchment to size of base of 9x5 loaf tin.Place on base of tin and grease, with a little bit of flour. Spray sides of tin with Bakers' Joy.

Cream the butter and sugar until light in color and fluffy. Gradually beat in eggs and milk.

Fold flour into the mixture, together with the grated lemon zest.

Spoon mixture into loaf tin.

Bake at 350 degrees Fahrenheit on middle shelf of oven, placing tin on cookie sheet to aid in spreading heat. Bake for 50 minutes until cake is pale golden brown and firm to touch.

Optional for drizzle: Pour drizzle mix over cake immediately after removing from oven. Allow glaze to set before removing cake from pan.

Set on wire rack to cool completely.

Coconut Cake for Easter


This is an "A" List cake. The coconut crumb of the cake is just right - moist and quite light (it is not necessary to apply any simple syrup) and the 30 minute baking time for 9-inch layers seems just right. I actually baked two sets of 9-inch cake layers then cut three of them into 8-inch layers as I wanted the cake to have a taller, slimmer look than a 9-inch would give. I put the fourth layer in the fridge for use at a later time but ate it all a few days later - I think it's best to freeze extra cake layers to avoid such temptations.

This was my Easter Dinner bring-along for friends on Easter Sunday. It proved to be a perfect dessert, both pretty and delicious. I got the recipe from Carole Walter's "Great Cakes" and also used a Swiss buttercream from her book. I smothered the outside with sweetened, moist coconut dotted with mini-malted Easter eggs. If I get another coconut cake request this is the recipe I will use, except to make more buttercream - the middle layer was a bit sparse on buttercream as the quantity was only meant for two layers.

Coconut Layer Cake

For the layers:

Ingredients
1/2 cup whole milk
1/4 cup coconut milk
1/2 cup dessicated shredded coconut, unsweetened
2-1/3 cups sifted cake flour (sift first, measure later)
2 tsps. baking powder
1/2 tsp. salt
2/3 cup (1-1/3 sticks) unsalted butter
1-1/3 cups superfine sugar
3 large eggs
1 tsp. vanilla extract

Method

In small saucepan, scald milk. Add the coconut, cover, and let steep for 30 minutes. Pour milk and coconut into the container of a food processor fitted with steel blade and pulse 8-10 times or until coconut is finely chopped. Transfer to a measuring cup and set aside.

Position rack in lower third of the oven and preheat to 350 degrees Fahrenheit. Cut two round 9-inch layers of parchment paper, one for each pan. Lightly butter parchment paper and spray sides with Bakers' Joy.

Sift together the flour, baking powder, and salt. Set aside.

Cut butter in 1-inch pieces and put them in the large bowl of KitchenAid stand-alone mixer fitted with paddle attachment. Soften on low speed. Increase speed to medium- high. Cream until smooth and light in color, about 1-1/2 to 2 minutes.

Add the sugar, one tablespoon at a time, taking 6 - 8 minutes to blend it in well. Scrape the sides of the bowl occasionally.

Add the eggs, one at a time at 1-minute intervals, scraping the sides of the bowl as necessary.

Add vanilla.

Reduce mixer speed to low. Add the flour mixture in three additions alternately with coconut/milk mixture in tow additions, starting and ending with the flour. Mix only until incorporated after each addition. Scrape the sides of the bowl and mix for 10 seconds longer.

Spoon the batter into the prepared pans (it is quite thick), smoothing the surfaces with the back of a tablespoon. Bake in the preheated oven on cookie tray for 25-30 minutes or until cake begins to come away from the sides of the pan, is golden brown on top, and is springy to the touch.

Remove from oven. Set the pans on cake racks to cool for 10 minutes. Invert pans onto racks sprayed with Bakers' Joy and remove pan and paper. Frost the cake when it is completely cool.

Assembly tip: Place one layer on plate top side down. Cut four 4-inch strips of waxed paper and slide the strips under the edges of the layer to keep plate clean. Spread the layer with frosting, leaving a 1/2 inch unfrosted border around the edges. Put the second layer top side up on the first. Using a long metal spatula, spread a thin layer of frosting around sides of cake. Use method of dipping spatula in hot water to get frosting to spread more easily. Frost top of cake. Smother in sweetend coconut flakes.

Storage - can keep in cool place under a glass dome. For long storage, cover loosely with an aluminum foil tent and refrigerate. Allow to stand at room temperature, 2-3 hours, before serving.

Swiss Meringue Buttercream


Swiss Buttercream
4 lg. egg whites
¾ cup sugar
1 ½ cups (3 sticks) unsalted butter, slightly firm
1 ½ -2 Tbsp. Grand Marnier or liqueur of your choice
1 tsp. vanilla

Place the egg whites in a lg/ bowl of a elevtric mixer and beat with the whisk attachment until the whites are foamy and they begin to thicken (just before the soft peak stage). Set the bowl over a saucepan filled with about 2 inches of simmering water, making sure the bowl is not touching the water. Then, whisk in the sugar by adding 1-2 tablespoon of sugar at a time over a minutes time. Continue beating 2-3 minutes or until the whites are warm (about 120 degrees) and the sugar is dissolved. The mixture should look thick and like whipped marshmallows.
Remove from pan and with either the paddle or whisk attachment, beat the egg whites and sugar on med-high until its a thick, cool meringue – about 5-7 minutes. *Do not overbeat*. Set aside.

Place the butter in a separate clean mixing bowl and, using the paddle attachment, cream the butter at medium speed for 40-60 seconds, or until smooth and creamy. *Do not overbeat or the butter will become toooooo soft.*

On med-low speed, blend the meringue into the butter, about 1-2 Tbsp. at a time, over 1 minute. Add the liqueur and vanilla and mix for 30-45 seconds longer, until thick and creamy.

Refrigerate 10-15 minutes before using.

Wait! My buttercream won’t come together! Reheat the buttercream briefly over simmering water for about 5 seconds, stirring with a wooden spoon. Be careful and do not overbeat. The mixture will look broken with some liquid at the bottom of the bowl. Return the bowl to the mixer and whip on medium speed just until the cream comes back together.

Wait! My buttercream is too soft! Chill the buttercream in the refrigerator for about 10 minutes and rewhip. If that doesn’t work, cream an additional 2-4 Tbsp. of butter in a small bowl– making sure the butter is not as soft as the original amount, so make sure is cool and smooth. On low speed, quickly add the creamed butter to the buttercream, 1 Tbsp. at a time.

Refrigerate in an airtight container for up to 5 days, or can be frozen for up to 6 months. If freezing, store in 2 16-oz. plastic containers and thaw in the refrigerator overnight or at room temperature for several hours.
Almond & Chocolate Cookies


Another great recipe from "Best Kept Secrets of the Women's Institute - Cakes and Biscuits." These cookies are quite delicate, not gooey like most chocolate chip cookies. I used my gram/ozs. scale to follow the metric measurements in the recipe - it's just too bothersome to convert to ozs. and the conversions tend to be awkward, such as 1-1/8 cups, etc.


Almond & Chocolate Cookies

Ingredients
250g AP flour
1/4 tsp. salt
115g confectioners' sugar
225g (8ozs.) butter, softened
1 egg yolk
1 teasp. almond essence
100g blanched almonds, chopped
100g chocolate chips (I used Nestle semi-sweet mini morsels)

Method
Sift flour and confectioners' sugar and salt together into separate bowl.
Beat butter and egg yolk in KitchenAid bowl until light and creamy. Add sifted dry ingredients. Continue beating for a couple of minutes.

Mix in almond essence, chopped almonds and chocolate chips thoroughly. Refrigerate dough for 30 mins to one hour.

Take walnut sized pieces (the TBS. scoop) of the dough and roll in balls. Place on silpat on cookie tray and flatten slightly with palm of hand.

Bake at 325 degrees Fahrenheit, on middle rung of oven, for 20-25 minutes, until cookies are firm and pale. [Watch carefully - they must not get too brown on edges - about 22 minutes is probably the best estimate.]

Leave the cookies to stand on the baking tray for 5 minutes, then remove to rack to cool.

Tuesday, March 20, 2012

Sour Cream Sugar Cookies


Very nice, classy sugar cookies - rolled quite thin and not too sweet. I got the recipe from Land O'Lakes. It makes a very large quantity so next time I will halve the quantities.

I think I'm getting the hang of making rolled sugar cookies now:

Chill dough.
Roll in small quantities (only enough to cut about 10 at a time).
Width should be somewhere between 1/8 and 1/4 inches (if rolled too thin they are impossible to prize off the pastry board).
Cut, then chill again before separating cookies from the dough.
Remove from fridge, separate cookies from the dough, use angled spatula to get them onto the baking tray.
work quickly, before the dough has a chance to get soft and sticky.

Recipe:

4 cups all-purpose flour
2 cups sugar
1 cup LAND O LAKES® Butter, softened
1/2 cup LAND O LAKES® Sour Cream
2 eggs
1 tablespoon baking powder
1 teaspoon baking soda
1 teaspoon vanilla1
2 teaspoon ground nutmeg
1/2 teaspoon salt
1/2 teaspoon lemon extract
Decorator sugars,and if desired Decorator frostings

Combine 2 cups flour and all remaining ingredients except decorator sugars and frosting in large mixer bowl. Beat at low speed, scraping bowl often, until well mixed (2 to 3 minutes). Stir in remaining 2 cups flour gradually, in portions, by hand.

Divide dough into 4 equal portions; wrap in plastic food wrap. Refrigerate until firm (at least 2 hours).

Heat oven to 350°F. Roll out dough on well floured surface, one portion at a time (keeping remaining dough refrigerated), to just over 1/8-inch thickness. Cut with 2 1/2-inch cookie cutters into desired shapes. Place 1 inch apart on ungreased cookie sheets; sprinkle with decorator sugars. Bake for 10 minutes or until edges are lightly browned. Decorate with frostings.

Saturday, March 17, 2012

Lemon Cheesecake Squares


These are really good. The recipe is from "Epicurious." The cheesecake has just enough lemony flavor and is very easy to make. I am not very fond of graham crackers so I used nilla wafers and animal crackers combined. Any mix of choice would be nice - perhaps ginger cookies and shortbread cookies.

Lemon Cheesecake Squares

Crust:
1-1/2 cups of Animal Crackers and Nilla Wafers, crushed
5 tablespoons butter

Filling:
1 8-ounce package cream cheese, room temperature
1/3 cup sugar
1 large egg
3 tablespoons sour cream
2 tablespoons fresh lemon juice
2 teaspoons finely grated lemon peel
1 teaspoon vanilla extract

PreparationFor crust:
Preheat oven to 350°F. Fold 16-inch long piece of foil to 8x16-inch strip; place in 8x8x2-inch metal baking pan, leaving overhang on 2 sides. Repeat with another sheet of foil in opposite direction, lining pan completely. Butter foil.

Finely chop crackers in a food processer. Melt butter in microwave.Add to crumbs and pulse until mixed. Press crumbs evenly onto bottom of prepared pan. Leave in refrigerator overnight to harden. Bake crust until deep golden, about 12 minutes. Cool crust while preparing filling.

For filling:
Using electric mixer, beat cream cheese and sugar in large bowl until smooth. Beat in egg and sour cream, then lemon juice, lemon peel, and vanilla. Spread batter over crust.

Bake cheesecake until slightly puffed and set in center, about 30 minutes; cool completely in pan on rack. Chill cheesecake until cold, at least 2 hours. Cover; keep chilled.

Using foil overhang as aid, lift cheesecake from pan. Cut into 16 squares; arrange on platter. Top each square with berries. Chill until ready to serve, up to 3 hours. Serve chilled.

Sunday, February 26, 2012

Quickbread - February Daring Bakers Challenge


The Daring Bakers’ February 2012 host was – Lis! Lisa stepped in last minute and challenged us to create a quick bread we could call our own. She supplied us with a base recipe and shared some recipes she loves from various websites and encouraged us to build upon them and create new flavor profiles.

This is a marvellous recipe, which I found in "Fine Cooking." I actually mixed the streusel with the rest of the batter, rather than sprinkling it on top of the loaf. I took my cake to work and it was very quickly eaten by the 5 people who were in the office - before lunch. Since baking this I have been surfing around looking for more quickbread recipes as I am so impressed with this kind of cake - quite easy to mix, easy to bake and delicious to taste. A quickbread is good for a breakfast cake too (or any other time). Thank you Liz for giving us this opportunity.

Cranberry, Orange & Walnut Streusel Bread

Yields four mini loaves, one 9x5-inch loaf, or one 12-cup Bundt cake.

6 oz. (3/4 cup) unsalted butter, softened; more for the pans
10-1/2 oz. (2-1/3 cups) unbleached all-purpose flour; more for the pans
1/2 cup walnut pieces
1/4 cup packed light or dark brown sugar
1 tsp. ground cinnamon
1-1/4 tsp. baking powder
3/4 tsp. table salt
3/4 cup sweetened dried cranberries, roughly chopped
1-1/2 tsp. finely grated orange zest
1-1/3 cups granulated sugar
3 large eggs
1 cup buttermilk

Position a rack in the middle of the oven, and heat the oven to 350°F. Lightly butter and flour four mini loaf pans, one 12-cup Bundt pan, or one 9x5-inch metal loaf pan.

In a food processor grind the walnuts, brown sugar, and cinnamon, pulsing in short bursts until the walnut pieces are small, 20 to 30 seconds. Set the streusel aside.

In a medium bowl, whisk the flour, baking powder, and salt. Add the cranberry pieces and orange zest and whisk again.

In the bowl of a stand mixer or in a medium mixing bowl, mix the butter on low speed with the stand mixer’s paddle attachment or on medium-low speed with a hand mixer until smooth. Add the sugar gradually and continue mixing on low until slightly fluffy. Scrape the bowl and beater. Add the eggs one at a time, mixing until smooth after each addition.

Stop the mixer, scrape the bowl and beater, and add half the flour mixture. On low speed (for either mixer), mix until the flour drifts disappear and then add half the buttermilk; mix until just blended. Repeat with the remaining flour and buttermilk. Scrape down the sides of the bowl and mix until smooth.

If using mini loaf pans, fill each pan about a third full with batter and spread smooth. Sprinkle a heaping tablespoon of the streusel over the batter in each of the pans. Divide the remaining batter among the pans, spread smooth, and sprinkle the top of each loaf with the remaining streusel. If using a Bundt pan or full-size loaf pan, pour in half the batter and spread smooth. Sprinkle half of the streusel over the batter, top with the remaining batter, spread smooth, and then sprinkle the remaining streusel over the top.

Bake until the loaves are golden and a skewer or toothpick inserted into the center comes out clean, 45 to 55 minutes for mini loaves (55 to 60 minutes for a Bundt pan and 60 to 65 minutes for a full-size loaf pan).

Let the loaves cool for 10 to 15 minutes in the pans on a rack to give them time to set and then turn them out onto a rack and flip right side up to cool completely.

Monday, January 16, 2012

Currant Scones - Daring Bakers January 2012 Challenge


Audax Artifex was our January 2012 Daring Bakers’ host. Audax worked tirelessly to master light and fluffy scones (a/k/a biscuits) to help us create delicious and perfect batches in our own kitchens!

These are my currant scones. I am quite pleased with them - they certainly taste good, but I think there is room for improvement still (perhaps a teeny bit higher). I would like to thank Audax for his excellent challenge choice and articles on "Sconery" - for the first time I triple-sifted the flour and it paid off. I have never made nice scones before this. I also went for the flaky scones, with larger bits of butter, and refrigerated the flour and dough between actual bench work times. I also chose the "by hand" option - so easy and restful, real comfort baking. I am taking them to the office tomorrow and cannot wait to see what the team has to say about them - it's something different as mostly they get cookies.

The next day: I think these have been the most popular desserts that I have taken to work yet! There was a VIP meeting in the boss's office so I put half of the scones on a plate for the meeting; the other half was for the rest of us; also provided salted butter and raspberry jam for those who did not want the scones plain. Talking about popularity, the group was even talking about them the following day.

Thank you, Audax! I can see that I will never be at a loss for what to make and am now browsing through a lot of U.K. scones recipes to get different kinds of flavors.

Recipe for Currant Scones (From Epicurious from Sarabeth's Bakery)
Ingredients
3/4 cup whole milk
2 large eggs, chilled
3 cups unbleached all-purpose flour, plus more as needed
1 tablespoon plus 1 teaspoon baking powder
2 tablespoons superfine sugar
1/4 teaspoon fine sea salt
A few gratings of fresh nutmeg
10 tablespoons (1 1/4 sticks) unsalted butter, chilled and cut into 1/2-inch cubes
1/2 cup dried currants
1 large egg, well beaten with a hand blender, for glazing
print a shopping list for this recipe

Preparation
1. Position a rack in the center of the oven and preheat to 425°F. Line a half-sheet pan with parchment paper.

2. TO MAKE THE DOUGH BY HAND: Whisk the milk and 2 eggs together in a small bowl; set aside. Sift the flour, baking powder, sugar, salt, and nutmeg into a medium bowl. Add the butter and mix quickly to coat the butter with the flour mixture. Using a pastry blender, cut the butter into the flour, scraping the butter off the blender as needed, until the mixture resembles coarse bread crumbs with some pea-size pieces of butter. Mix in the currants. Using a wooden spoon, stir in the milk mixture and mix just until the dough clumps together. TO USE A MIXER: Whisk the milk and 2 eggs together in a small bowl; set aside. Sift the dry ingredients together into the bowl of a heavy-duty stand mixer. Add the butter. Attach the bowl to the mixer and fit with the paddle attachment. Mix on medium-low speed until the mixture looks mealy with some pea-size bits of butter. Mix in the currants. Reduce the mixer speed to low. Add the milk mixture, mixing just until the dough barely comes together.

3. Turn the dough out onto a well-floured work surface and sprinkle about 2 tablespoons of flour on top. Knead the dough a few times, just until it doesn't stick to the work surface. Do not overwork the dough. The surface will be floured, but the inside of the dough should remain on the wet side. Gently roll out the dough into a 3/4-inch-thick round.

4. Using a 2 1/2-inch fluted biscuit cutter, dipping the cutter into flour between cuts, cut out the scones (cut straight down and do not twist the cutter) and place 1 1/2 inches apart on the prepared half-sheet pan. To get the most biscuits out of the dough, cut out the scones close together in concentric circles. Gather up the dough scraps, knead very lightly, and repeat to cut out more scones. You should get two scones from the second batch of scraps. Brush the tops of the scones lightly with the beaten egg, being sure not to let the egg drip down the sides (which would inhibit a good rise).

5. Place the scones in the oven and immediately reduce the heat to 400°F. Bake until golden brown, about 20 minutes. Cool on the pan for a few minutes, then serve warm or cool completely.